
Maybe it’s the colorful pieces tucked into a vintage candy dish, the sweet vanilla aroma filling the kitchen, or that first chewy bite that instantly takes you back to holidays and family gatherings.
That’s exactly what I love about Old-Fashioned Jelly Nougat Candy.
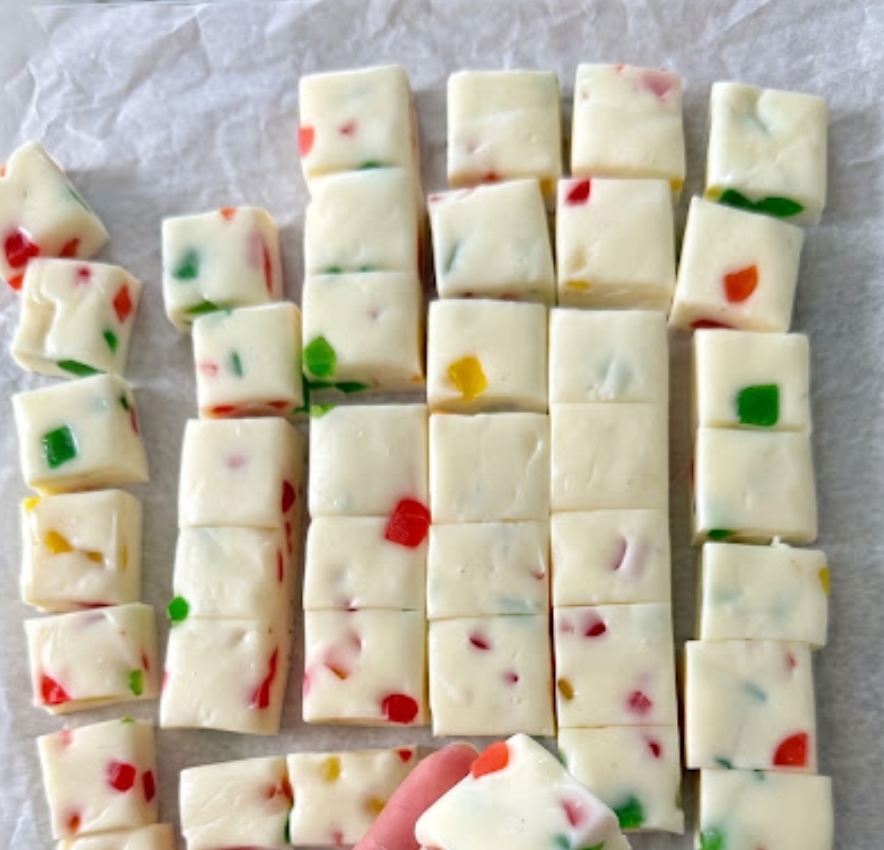
It’s soft, chewy, creamy, and dotted with little pieces of colorful jelly candy that make every bite look like something straight out of an old-fashioned confectionery shop. And honestly, it’s just plain fun to make!
If you love vintage candy recipes, homemade treats, and recipes that look impressive without requiring a professional candy-making kitchen, you’re going to want to save this one.
Love nostalgic recipes like this? Subscribe by email so you can have new old-fashioned favorites delivered straight to your inbox!
What Is Jelly Nougat Candy?
Jelly nougat candy is a soft, chewy confection traditionally made with a sweet nougat-style mixture and colorful pieces of jelly candy or gumdrops folded throughout.
The finished candy is wonderfully chewy with little bursts of fruity sweetness scattered through the creamy base.
It’s also one of those recipes where the appearance is almost as much fun as the taste.
Cut the candy into squares, and you’ll see bright bits of color peeking through every piece. Arrange them on a platter and suddenly you have a homemade candy assortment that looks incredibly festive.
And the best part?
You don’t need a fancy candy shop to make it.
Why You’ll Love This Old-Fashioned Candy
There are plenty of reasons this vintage-inspired treat deserves a spot in your recipe box.
It’s Beautiful Without Much Decorating
The colorful jelly pieces do all the work. Once the candy is cut, every square has its own little pattern of fruity color.
It’s Perfect for Holidays
Red, green, yellow, orange, and other bright candy colors make this especially pretty for Christmas, Easter, birthdays, showers, and cookie exchanges.
It’s Great for Gifting
Place the pieces in small candy boxes, tins, or cellophane bags, and you’ve got a homemade gift people will be excited to receive.
It’s Nostalgic
If you grew up eating homemade candy, this recipe has that wonderful old-fashioned quality that modern store-bought sweets sometimes lack.
It Can Be Made Ahead
Candy is a fantastic make-ahead treat, which makes this recipe especially handy when you’re preparing for a gathering.
What Does Jelly Nougat Candy Taste Like?
The nougat itself is sweet, creamy, and pleasantly vanilla-forward, while the jelly candy adds fruity little pockets of flavor.
The texture is the real star.
It should be soft and chewy rather than brittle or hard. When you bite into a piece, the nougat gives slightly before becoming deliciously chewy, with the jelly candy adding a contrasting texture.
Think of it as a cross between a classic chewy nougat and a colorful old-fashioned jelly candy.
And that combination is anything but boring!!
Ingredients You’ll Need
The exact ingredients can vary between vintage nougat recipes, but a classic homemade version typically uses:
- Granulated sugar
- Light corn syrup
- Evaporated milk
- Unsalted butter
- Vanilla extract
- Mini marshmallows
- Powdered sugar, for helping with shaping and handling
- Colorful jelly candies or gumdrops
Choosing the Jelly Candy
Use soft, chewy jelly candies rather than hard candies.
Gumdrops work particularly well because they can be cut into small pieces and provide plenty of color.
If your candies are extremely sticky, lightly dust your knife with powdered sugar before chopping them.
What You’ll Need
You don’t need a huge collection of candy-making equipment.
A few basic kitchen tools will do the job:
- Medium or large heavy-bottomed saucepan
- Wooden spoon or heat-resistant spatula
- Candy thermometer
- 8- or 9-inch square baking pan
- Parchment paper
- Sharp knife
- Cutting board
- Measuring cups and spoons
Why a Candy Thermometer Helps
Candy temperature matters.
Unlike making cookies, where you can often get away with estimating, cooked candy depends heavily on temperature to reach the proper texture.
A candy thermometer takes much of the guesswork out of the process.
Ingredient Additions and Substitutions
One of the things I love about homemade candy is how easily you can personalize it.
Try Different Jelly Candies
Use a mixture of colors and flavors, or choose colors that match a holiday.
Add Nuts
Finely chopped pecans or walnuts can add a lovely crunch.
If you’re making the candy for someone with nut allergies, simply leave them out.
Change the Extract
Vanilla is the classic choice, but almond extract can add a lovely bakery-style flavor.
You can even use a small combination of vanilla and almond extract.
Use Different Candy Colors
For Christmas, try red and green.
For Valentine’s Day, pink and red are gorgeous.
For Easter, pastel jelly candies make the nougat look especially cheerful.
How to Make Old-Fashioned Jelly Nougat Candy
Step 1: Prepare the Pan
Line an 8- or 9-inch square pan with parchment paper, leaving a little extra paper hanging over the sides.
This makes the finished candy much easier to remove.
Lightly grease the parchment if needed.
Step 2: Chop the Jelly Candy
Cut the jelly candies or gumdrops into small pieces.
You don’t want huge chunks because they can make the candy difficult to cut.
Small pieces distribute the fruity flavor throughout the nougat much more evenly.
Set them aside while you prepare the candy mixture.
Step 3: Cook the Sugar Mixture
Place the sugar, corn syrup, evaporated milk, and butter into a heavy-bottomed saucepan.
Heat the mixture over medium heat, stirring frequently.
As the butter melts and the sugar dissolves, the mixture will become smooth and creamy.
Step 4: Watch the Temperature
Continue cooking until the mixture reaches the appropriate candy-making temperature for a soft nougat-style consistency.
Use your candy thermometer rather than relying only on color.
This is one of those moments where patience really pays off.
Don’t walk away from the pot!
Sugar mixtures can change quickly once they get hot.
Step 5: Add the Marshmallows
Remove the mixture from the heat and stir in the mini marshmallows.
Keep stirring until they melt into the warm mixture and everything becomes smooth.
The smell at this point is incredible.
Sweet, buttery, vanilla-like, and exactly what you want a homemade candy kitchen to smell like!
Step 6: Add the Vanilla
Stir in the vanilla extract.
If you’re using almond extract too, add it now.
Give everything a good stir so the flavor is evenly distributed.
Step 7: Fold in the Jelly Candy
Allow the mixture to cool slightly so the jelly pieces don’t immediately melt into the hot nougat.
Then gently fold in the chopped jelly candy.
Work fairly quickly, but don’t rush.
You want those colorful pieces to stay distinct.
Step 8: Press Into the Pan
Transfer the candy mixture to the prepared pan.
Use a lightly greased spatula or parchment paper to gently press and smooth the mixture into an even layer.
Don’t pack it down aggressively.
Just make sure the surface is reasonably level.
Step 9: Let It Set
Allow the candy to cool completely at room temperature.
Depending on the recipe and the temperature of your kitchen, this may take several hours.
For the cleanest cuts, let it firm up thoroughly before slicing.
Step 10: Cut Into Pieces
Lift the candy from the pan using the parchment paper.
Place it on a cutting board and use a sharp knife to cut it into squares or rectangles.
If the knife gets sticky, lightly grease it or dust it with powdered sugar.
And there you have it!
Beautiful little pieces of old-fashioned jelly nougat candy.
How to Serve Jelly Nougat Candy
This candy is lovely served in so many ways.
For a Holiday Dessert Table
Arrange the pieces on a pretty platter alongside cookies, fudge, and other homemade candies.
For Gifts
Place the candy into small decorative boxes or tins.
Add parchment paper between layers so the pieces don’t stick together.
For Candy Buffets
The bright colors make this a fun addition to birthday parties, baby showers, bridal showers, and holiday candy tables.
With Coffee or Tea
A small piece alongside a hot cup of coffee or tea makes a wonderfully old-fashioned afternoon treat.
Tips for Making the Best Jelly Nougat Candy
Don’t Rush the Cooking
Candy making rewards patience.
Keep the heat controlled and watch the mixture carefully.
Use a Heavy-Bottomed Pan
A heavy saucepan distributes heat more evenly and can help reduce the chance of scorching.
Keep Stirring
Sugar mixtures can stick and burn surprisingly quickly.
Stay nearby and stir as directed.
Don’t Add the Jelly Candy Too Early
If the nougat mixture is extremely hot, the jelly pieces may melt or bleed their colors.
Let the mixture cool slightly first.
Cut the Candy Small
This is rich candy.
Small squares are perfect, and they make the batch go much further.
Use Parchment Paper
Trust me on this one.
It makes removing the candy so much easier.
How to Store Jelly Nougat Candy
Store the finished candy in an airtight container at room temperature.
Place parchment or wax paper between layers if the pieces tend to stick together.
Keep the container away from direct sunlight and heat.
A cool, dry pantry is ideal.
Can You Refrigerate It?
You can, but refrigeration may alter the texture and can sometimes make candy feel firmer or stickier.
Room-temperature storage is generally preferable when the candy is stable and your kitchen isn’t unusually warm.
Can You Freeze Jelly Nougat Candy?
Freezing homemade candy can sometimes affect its texture, particularly because of the moisture in the jelly pieces.
If you do freeze it, wrap the candy very well in airtight packaging and thaw it gradually while still wrapped.
For the best texture, however, I’d make it a few days ahead rather than relying on the freezer.
Frequently Asked Questions
What kind of jelly candy should I use?
Soft gumdrops or similar chewy jelly candies are a great choice. Look for candies that are easy to chop into small pieces.
Why is my nougat too sticky?
Candy texture depends heavily on cooking temperature. If the mixture doesn’t reach the appropriate temperature, it may remain softer and stickier than intended.
Humidity can also affect homemade candy.
Why did my jelly candy melt?
The nougat mixture may have been too hot when the jelly pieces were added. Let the mixture cool slightly before folding them in.
Can I add nuts?
Absolutely. Chopped pecans or walnuts are especially good if you enjoy a little crunch.
Can I make this candy without a candy thermometer?
It’s possible with traditional candy-making experience, but a thermometer makes the process much more reliable.
How long does homemade jelly nougat last?
When stored properly in an airtight container in a cool, dry place, it can keep for several days and often longer depending on the exact ingredients and moisture level.
For the best texture and flavor, I prefer enjoying it within about a week.
Why did my candy turn out too hard?
Overcooking is one possible reason. Candy becomes firmer as more moisture cooks away, so temperature control is extremely important.
General Information
Recipe type: Homemade candy
Cuisine: American-inspired vintage candy
Texture: Soft and chewy
Flavor: Sweet, creamy, fruity, vanilla
Best for: Holidays, gifting, parties, candy trays
Prep time: About 20 minutes
Cooking time: Varies with the candy temperature
Setting time: Several hours
Servings: Approximately 24–36 small pieces, depending on how you cut them
Approximate Nutrition
Nutrition will vary depending on the specific jelly candies, portion size, and recipe proportions.
As a rough estimate, one small piece may contain approximately:
- Calories: 100–130
- Carbohydrates: 18–24g
- Sugar: 14–20g
- Fat: 3–5g
- Protein: 1–2g
Because homemade candy can vary considerably from batch to batch, consider these numbers a general estimate rather than exact nutritional information.
Final Thoughts
Old-fashioned candy recipes have a special kind of charm.
They’re not just about satisfying a sweet tooth. They’re about making something by hand, watching simple ingredients transform in a saucepan, and creating a treat that looks like it belongs in a glass candy jar at Grandma’s house.
And this Jelly Nougat Candy is such a fun example.
It’s colorful, chewy, sweet, and surprisingly simple once you get comfortable with the candy-making process.
The hardest part?
Waiting for it to cool enough to cut.
And yes, I absolutely recommend sneaking a tiny piece once it’s ready. You know, just for quality control!
If you make this candy, I’d love to hear how it turned out. Leave a review and share a photo on Pinterest so other homemade-candy lovers can see your beautiful batch!
More Old-Fashioned Treats to Try
If nostalgic sweets are your thing, you might also enjoy:
- Classic homemade fudge
- Old-fashioned peanut brittle
- Homemade divinity candy
- Southern pecan pralines
- Chocolate-covered cherries
- Classic coconut candy
- Homemade caramel squares
- Old-fashioned butter cookies
There’s just something about recipes like these that never really goes out of style.