
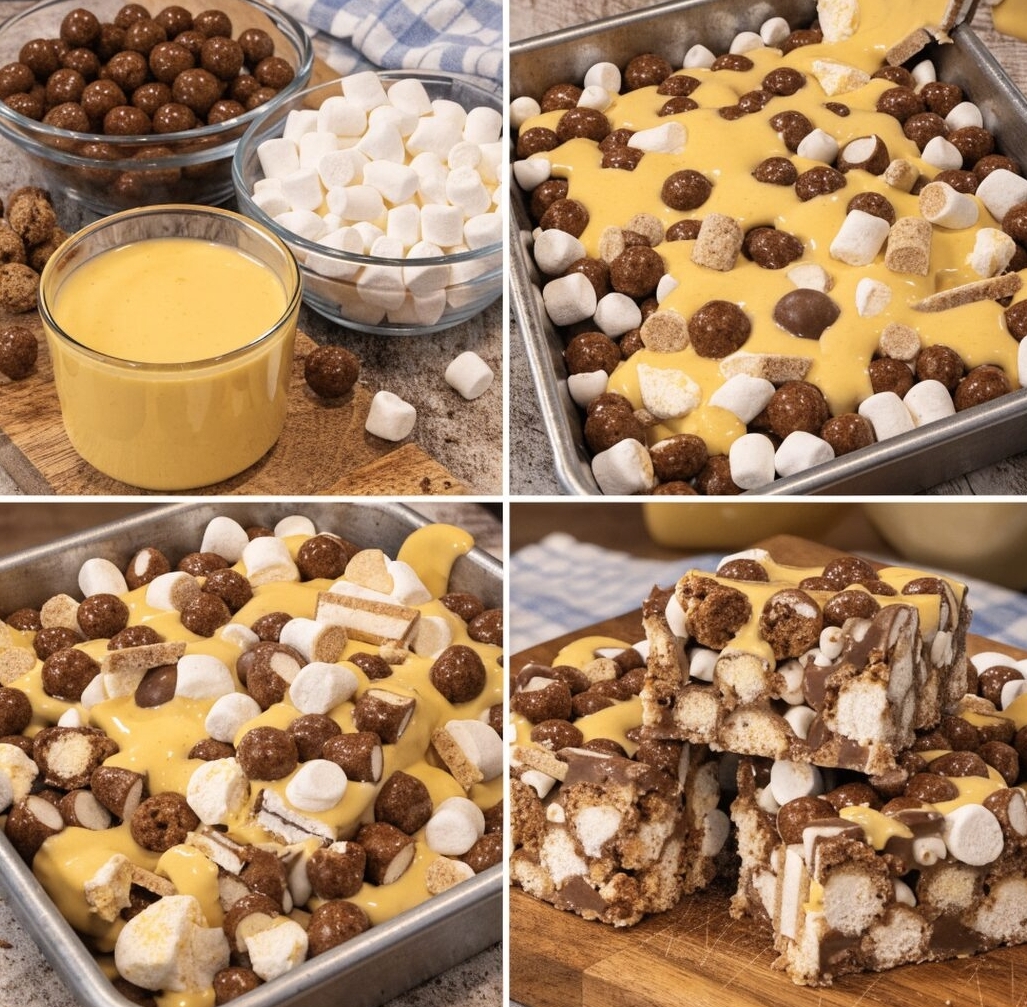
Easy No-Bake Chocolate Cereal and Marshmallow Bars
Looking for a quick and incredibly delicious dessert that requires no baking? These no-bake chocolate cereal and marshmallow bars are exactly what you need! Combining the crunchy texture of malted milk balls, the chewiness of marshmallows, and a rich, sweet binder, these bars are a delightful treat that comes together in a flash. Perfect for parties, lunchboxes, or a simple sweet craving, this recipe is a guaranteed crowd-pleaser that will have everyone asking for more.
This easy recipe proves that you don’t need to spend hours in the kitchen to create something truly special. With minimal effort and just a few basic ingredients, you can achieve a dessert that’s both satisfying and impressive. Get ready to enjoy the ultimate convenience and flavor with these homemade no-bake bars!
Why You’ll Love This Recipe
- No Baking Required: Perfect for hot days or when you just don’t want to turn on the oven.
- Quick to Make: From start to finish, these bars come together in under 30 minutes of active prep time.
- Simple Ingredients: Uses common pantry staples that are easy to find.
- Customizable: Easily adapt with your favorite cereals or candies.
- Kid-Friendly: A fun recipe to make with children, and they’ll love eating the results!
- Perfect for Any Occasion: Great for picnics, potlucks, birthday parties, or just a sweet snack at home.
Ingredients
Gather your ingredients to make these delightful no-bake chocolate cereal and marshmallow bars. The beauty of this recipe lies in its simplicity and the readily available items you’ll need.
- 6 cups chocolate malted milk balls (whole, uncrushed)
- 4 cups mini marshmallows
- 1 cup chopped chocolate wafer bars (like Kit Kat, optional but recommended for extra texture)
- 1 (14-ounce) can sweetened condensed milk
- 1/2 cup white chocolate chips or yellow confectionery coating (melted)
- 1 tablespoon butter (for greasing the pan, optional)
Ingredient Notes
- Chocolate Malted Milk Balls: These provide a fantastic crunch and a rich chocolatey malt flavor. Ensure they are whole and uncrushed for the best texture in the bars. You can use any brand you prefer.
- Mini Marshmallows: The mini size melts easily and distributes evenly, creating that classic chewy texture throughout the bars. If you only have large marshmallows, you can cut them into smaller pieces, but mini is ideal.
- Chopped Chocolate Wafer Bars: While optional, adding chopped Kit Kat bars or similar wafer bars introduces another layer of chocolatey goodness and a delightful crisp texture. This elevates the bars beyond a simple marshmallow treat.
- Sweetened Condensed Milk: This is the crucial binder that holds everything together and adds a creamy sweetness. Do not substitute with evaporated milk, as it won’t provide the same consistency or sweetness.
- Melted White Chocolate Chips or Confectionery Coating: This acts as an additional binder and adds a smooth, sweet finish. A yellow confectionery coating can give a slightly different flavor profile and color, but white chocolate chips are a great alternative. Ensure it’s fully melted and smooth before combining.
How to Make No-Bake Chocolate Cereal and Marshmallow Bars
Follow these simple steps to create your irresistible batch of no-bake bars:
- Prepare Your Pan: Lightly grease a 9×13 inch rectangular baking pan with butter or line it with parchment paper, leaving an overhang on the sides for easy removal. This will prevent sticking and make cutting the bars much simpler.
- Combine Dry Ingredients: In a large mixing bowl, combine the whole chocolate malted milk balls, mini marshmallows, and chopped chocolate wafer bars (if using). Gently toss to ensure everything is evenly distributed.
- Melt Binder: In a separate microwave-safe bowl, melt the white chocolate chips or yellow confectionery coating. Heat in 30-second intervals, stirring well after each, until smooth and fully melted. Alternatively, melt in a double boiler on the stovetop.
- Add Condensed Milk: Pour the entire can of sweetened condensed milk over the dry ingredient mixture in the large bowl.
- Combine Everything: Pour the melted white chocolate or confectionery coating over the mixture. Using a sturdy wooden spoon or a spatula, mix thoroughly until all the dry ingredients are fully coated and evenly distributed with the wet mixture. This might take a few minutes as the mixture will be thick and sticky.
- Press into Pan: Transfer the mixture into the prepared baking pan. Using the back of the spatula or your hands (lightly greased if it’s too sticky), press the mixture down firmly and evenly into the pan. Make sure it’s compacted well to ensure the bars hold together.
- Chill: Place the pan in the refrigerator for at least 2-3 hours, or until the bars are completely set and firm. This chilling time is essential for the bars to solidify properly.
- Cut and Serve: Once firm, lift the bars out of the pan using the parchment paper overhang. Place on a cutting board and slice into squares or rectangles of your desired size. Serve immediately and enjoy!
Helpful Cooking Tips
- Evenly Pressing: For uniform bars, ensure you press the mixture firmly and evenly into the pan. This prevents crumbly sections and ensures every bar is perfect.
- Greasing Hands: If the mixture is too sticky to press with your hands, lightly grease them with butter or cooking spray.
- Parchment Paper: Using parchment paper with an overhang is highly recommended for easy removal and cleanup. It makes lifting the entire slab out of the pan effortless.
- Quality Ingredients: While this recipe is simple, using good quality malted milk balls and condensed milk can make a noticeable difference in the final taste.
Ingredient Substitutions
- Malted Milk Balls: You can experiment with other small, crunchy chocolate cereals or even chocolate-covered pretzels for a salty-sweet twist.
- Mini Marshmallows: While mini are best, if you only have large marshmallows, cut them into smaller pieces before adding.
- Chocolate Wafer Bars: Any crunchy chocolate bar can be chopped and added. Chocolate sandwich cookies (like Oreos) could also work, but the texture will be different.
- Sweetened Condensed Milk: This is a core ingredient and difficult to substitute without significantly changing the recipe’s outcome.
- White Chocolate/Confectionery Coating: Milk chocolate or dark chocolate chips can be melted and used for an all-chocolate version.
Variations
- Nutty Bars: Add 1/2 cup of chopped roasted peanuts or almonds for extra crunch and flavor.
- Peanut Butter Swirl: Swirl in 1/4 cup of melted peanut butter with the condensed milk for a peanut butter chocolate combination.
- Holiday Themed: Use colored marshmallows or sprinkles to match holiday themes.
- Espresso Kick: Add 1 teaspoon of instant espresso powder to the melted white chocolate for a coffee-chocolate twist.
Serving Suggestions
These no-bake chocolate cereal and marshmallow bars are fantastic on their own, but here are a few ideas to elevate your serving experience:
- Serve alongside a scoop of vanilla ice cream for a delightful contrast in temperature and texture.
- Drizzle with extra melted chocolate or a caramel sauce just before serving.
- Pair with a glass of cold milk or a hot cup of coffee for a comforting snack.
- Cut into smaller bite-sized pieces for a party platter or dessert buffet.
Storage and Reheating
- Storage: Store the no-bake bars in an airtight container at room temperature for up to 3-4 days, or in the refrigerator for up to a week. Keeping them in the fridge will make them firmer.
- Freezing: These bars can be frozen for up to 1 month. Wrap individual bars tightly in plastic wrap, then place them in a freezer-safe bag or container. Thaw at room temperature before serving.
- Reheating: No reheating is necessary! These bars are meant to be enjoyed at room temperature or chilled.
Frequently Asked Questions
Q: Can I use a different type of cereal?
A: Yes, you can experiment with other cereals. Just make sure they are sturdy enough to hold their shape and complement the chocolate and marshmallow flavors. Chocolate rice crispy cereal would be a good alternative.
Q: Why are my bars not setting?
A: The most common reason for bars not setting is not enough chilling time or an incorrect ratio of wet to dry ingredients. Ensure you use sweetened condensed milk (not evaporated milk) and chill the bars for at least 2-3 hours, or longer if needed, until firm.
Q: Can I make these ahead of time?
A: Absolutely! These bars are perfect for making ahead. They can be stored in the refrigerator for several days, making them an ideal dessert for meal prep or entertaining.
Q: Are these bars gluten-free?
A: If you use gluten-free malted milk balls and ensure any chocolate wafer bars or other additions are gluten-free, then yes, they can be made gluten-free. Always check ingredient labels.
Final Recipe Notes
These no-bake chocolate cereal and marshmallow bars are a testament to how simple ingredients can create truly memorable desserts. Their ease of preparation makes them a go-to recipe for busy days, while their rich, chewy, and crunchy texture makes them utterly irresistible. Whether you’re a seasoned baker or a complete novice, this recipe is foolproof and delivers delicious results every time. Enjoy the process and the delightful outcome!
Ingredients
- 6 cups chocolate malted milk balls (whole, uncrushed)
- 4 cups mini marshmallows
- 1 cup chopped chocolate wafer bars (like Kit Kat, optional)
- 1 (14-ounce) can sweetened condensed milk
- 1/2 cup white chocolate chips or yellow confectionery coating (melted)
- 1 tablespoon butter (for greasing the pan, optional)
Instructions
- Lightly grease a 9×13 inch rectangular baking pan with butter or line it with parchment paper, leaving an overhang on the sides for easy removal.
- In a large mixing bowl, combine the whole chocolate malted milk balls, mini marshmallows, and chopped chocolate wafer bars (if using). Gently toss to ensure everything is evenly distributed.
- In a separate microwave-safe bowl, melt the white chocolate chips or yellow confectionery coating. Heat in 30-second intervals, stirring well after each, until smooth and fully melted.
- Pour the entire can of sweetened condensed milk over the dry ingredient mixture in the large bowl.
- Pour the melted white chocolate or confectionery coating over the mixture. Using a sturdy wooden spoon or a spatula, mix thoroughly until all the dry ingredients are fully coated and evenly distributed with the wet mixture. This might take a few minutes as the mixture will be thick and sticky.
- Transfer the mixture into the prepared baking pan. Using the back of the spatula or your hands (lightly greased if it’s too sticky), press the mixture down firmly and evenly into the pan. Make sure it’s compacted well to ensure the bars hold together.
- Place the pan in the refrigerator for at least 2-3 hours, or until the bars are completely set and firm. This chilling time is essential for the bars to solidify properly.
- Once firm, lift the bars out of the pan using the parchment paper overhang. Place on a cutting board and slice into squares or rectangles of your desired size. Serve immediately and enjoy!
- Prep time: 15 minutes
- Cook time: 0 minutes
- Total time: 2 hours 15 minutes (includes chilling)
- Servings: 12-16 bars